Crocheting in the Round: How and Where to Join
I used to have a blog called Crochet Your Way and I occasionally posted tutorials there to help crocheters with problems I typically encounter when I teach crochet classes. Today's post is a re-post of a crochet tutorial from www.crochetyourway.com. I always meant to share it here one day and I just received an email asking me to post it again. So here we go!
I know one of the biggest problems crocheters have is trying to determine where to join the beginning and end of a round. This tutorial should help. Please note, these instructions are for crocheting in the round, not for crocheting in a spiral.
I am going to demonstrate the first
round on a pattern that calls for making:
- a chain 6 circle, slip stitch to first chain to join in the round
- then chaining 3 (the chain 3 counts as the first double crochet), and making 17 double crochets in the circle for a total of 18 double crochets, then slip stitching into the 3rd chain of the chain 3 that I started with.
 |
Photo
1.
In Photo 1, you can see that I’ve made
the chain 6 circle and have chained 3.
 |
Photo
2.
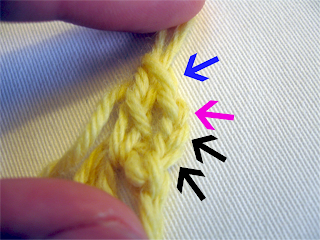
Photo 2 shows a side view of the chain
3 and the first double crochet. The 2 black arrows point to the first 2
chains and the pink arrow points to the third chain. Once you have
crocheted all the stitches in the round, this is where you will slip stitch to
join the round into a completed circle. The blue arrow indicates the top
of the first double crochet made after the chain 3. Do not slip stitch
into that stitch at the end of the round!
 |
Photo
3.
Photo 3 shows the same thing from a
different angle. Again, you can see the first 2 chains of the chain 3
identified by black arrows. The third chain (pink arrow) is where you
will slip stitch into at the end of the round to close the circle. The
blue arrow shows the top of the first double crochet (technically, your second
stitch). Notice how the top loop of the first double crochet (blue arrow)
is to the right of the leg of the
stitch (the part that connects to the center). This can help you identify
where not to slip stitch.
 |
Photo
4.
In Photo 4, I have double crocheted 17
double crochets (and I started with a chain 3, that makes 18 double crochets
total). I am about to join the round to close the circle. Tip: Sometimes it can be difficult to
fit all the stitches in that little circle. Do not be afraid to tug on
them and pull them out of the way so you can keep making stitches. Do not crochet over other stitches you have
already made in this round. My instructions say to slip stitch in the
third chain of the chain 3. The pink arrow shows the third chain.
Try to get your hook under both loops of that chain if you can to make the slip
stitch.
 |
Photo
5.
In Photo 5, I am completing the slip
stitch. The pink arrow shows the third chain where my hook is inserted
and the blue arrow shows the leg of the double crochet I made after the
original chain 3. There are two loops on my hook: the farthest right loop
is from completing the previous stitch and the left loop is my slip stitch that
I will now pull through the loop on the right end of the hook to close the
circle.
This technique applies whether you are
crocheting single crochets or half double crochets or trebles, etc., into a
circle. The only difference is the number of chains you start with at the
beginning, which also determines where you will slip stitch at the end:
- for a single crochet circle, after you’ve made the circle, you start with a chain 1, make your single crochets in the circle and slip stitch into that original chain 1.
- for a half double crochet circle, after making the circle, chain 2, make your half double crochets around and slip stitch into the 2nd chain of the original chain 2.
- for a treble crochet circle, after making the circle, chain 4, make your treble crochets into the circle and slip stitch into the 4th chain of the original chain 4 to close it.
Should you count the first chain(s) as
a stitch? Generally, yes, I do. From what I have found, most
patterns and especially charts do count it as a stitch. (this may not apply to crocheting flat (back and forth, it depends on the pattern and stitch).
I hope you’ve found this little
explanation helpful!
-->


Comments